Our API service relies heavily on background processing to cache endpoints to serve to desktop and mobile. Recently we migrated over from Resque to Sidekiq; in the past few months/years, Sidekiq has been more actively developed and has become the de-facto library for background processing.
While on Resque, at peak traffic, we’ve spun up as much as 36 c1.xlarge AWS servers, each running 12 Resque workers, to try and keep up with the queues. However, even then, at times jobs back up and we fall far behind.
Sidekiq boasts an architecture that can process jobs in a multi-threaded environment. Thus, instead of spinning up an instance of Rails for each worker, Sidekiq just needs to start one instance of your environment with a customizable “concurrency” setting, which is the number of workers processing in the same environment.
Moving the worker code over
Sidekiq claims to be a drop-in replacement for Resque, which I found for the most part to be true.
The first thing I updated were the workers. The main difference here is that worker methods for Resque are class methods, but worker methods for Sidekiq are instance methods. Within a worker, we include Sidekiq::Worker, change def self.perform(args) to def perform(args), and that enables Sidekiq to access the workers. We also specify the queues in our workers, so we change @queue = :priority to sidekiq_options queue: :priority.
The majority of our calls to Resque workers were in the form of:
Resque.enqueue(WorkerName, arg1, arg2)
In these cases, I just needed to change Resque to Sidekiq::Client; the rest of the statement stays the same:
Sidekiq::Client.enqueue(WorkerName, arg1, arg2). An alias for that syntax in Sidekiq is WorkerName.perform_async(arg1, arg2), which is a little less wordy and more straightforward.
Configuring Sidekiq
Configuring Sidekiq is pretty straightforward as well too. Sidekiq is on a client/server framework, which is explained here. Essentially the client process runs your web app process and allows you to push jobs into the background for processing. The server process pulls jobs from the Redis queue and processes them.
Thus you need to configure both Sidekiq.client and Sidekiq.server but thankfully they are quick. In config/initializers/sidekiq.rb, you need to require the sidekiq files, find your Redis url and point both the Sidekiq client and server at it. Our sidekiq.rb looks like this:
I’ve also added a few other configuration lines to that file. One so that sidekiq doesn’t retry a job over and over again if it fails:
Sidekiq.default_worker_options = { 'retry' => 1 }
Then, to secure the Sidekiq dashboard with a username/password (similar to the Resque dashboard), we add these lines:
Sidekiq::Web.use(Rack::Auth::Basic) do |user, password|
    [user, password] == ["username", "password"]
end
Finally, we want to mount the dashboard in our routes.rb file so we can access the web UI:
mount Sidekiq::Web => '/sidekiq'
Migrating Resque scheduler to Sidekiq scheduler
We use a Resque plug-in called resque-scheduler to schedule jobs to run. We have a resque_scheduler.yml in /config directory and it lists out the jobs in the following format
priority_canary:
  every: 1m
  class: ResqueCanary
  args: priority
  description: "Updates a timestamp on redis for up check purposes"
I found a Sidekiq plugin called (surprise) sidekiq-scheduler, which basically ported Resque scheduler over.
I wanted to keep the system architectural pattern the same; namely, while on Resque, we had one stack running Resque scheduler and one stack running Resque workers, so we could scale the Resque workers as needed. In Resque, to start up the scheduler, you run rake resque:scheduler, and it just runs the scheduler. However, Sidekiq is a little different- when you run sidekiq, it loads up all of sidekiq and its config file. Thus, if by default, you load up your scheduler configuration, all of the sidekiq processes will also schedule jobs, which is not what we want.
To resolve this, I created a specific config just for the scheduler process. You can custom load Sidekiq config using:
bundle exec sidekiq -C ./config/sidekiq_schedule.yml
In that config, I put all the scheduling config, and set concurrency to 0. With that command, the scheduler starts up, loads all the schedules and does not have any worker processing any jobs. Thus it acts just like Resque’s scheduler, and so we could keep the same scheduler/worker architecture.
One gotcha with that configuration is that, by default, Sidekiq sets a Redis connection pool size by adding 2 to the concurrency configuration. Thus, since I set concurrency to 0, it had a pool size of 2. I think this caused errors down the line. I would see Timeout errors after scheduler ran for a few days:
2014-11-19_03:02:07.97707 2014-11-19T03:02:07.976Z 20668 TID-fa81g INFO: Timeout::Error: Waited 1 sec
I manually set the connection pool size in the Sidekiq config, and monitored to see if it fixed the issue. It still occurred twice in the 3 weeks prior, so it seems like it still didn’t fix the issue. So based on Mike Perham’s recommended way of scheduling jobs, I’ve looked into replacing sidekiq-scheduler with the Clockwork gem or the Whenever gem.
Whenever gem
The Whenever gem lets you create jobs in a clean and clear syntax and then translates your code into cron syntax, so that your system cron can parse and use it.
The problem I ran into when trying to use whenever is that it didn’t seem to work well with rvm. The cron commands needed to be run in the context of a particular gemset but I couldn’t get it to switch properly.
Clockwork gem
Clockwork, on the other hand, is billed as a cron replacement. It does not leverage your system cron, but instead runs as a lightweight Ruby process. So it isn’t quite as system-level as the Whenever gem, but hopefully because it is so lightweight, it is stable.
Also, it seems to be a good replacement for sidekiq-scheduler because it can easily be configured to run on just one server (scheduler server).
Syntax for scheduling a job:
  every(90.minutes, 'update_content_player') do
    UpdateContentPlayer.perform_async
  end
Syntax for scheduling a job while specifying a queue and an argument:
  every(1.minute, 'priority_canary') do
    Sidekiq::Client.push("queue" => "priority", "class" => BackgroundWorkerCanary, "args" => ["priority"])
  end
Tweaking workers per thread
Finally, one last setting that I tweaked was regarding the number of workers running on production. I originally left concurrency at default (25 workers), so each Sidekiq process had 25 workers running. Then I ran 2 Sidekiq processes per Production worker server. This seemed to cause the jobs to run slowly.
So I tried to use a bigger/faster instance with more cores, and run fewer workers per core. I ended up using a c3.2xlarge instance with 10 workers per thread and 8 threads per server.
Not exactly back down to Resque-level execution time, but it improved a lot from the 25 workers per thread. I’m thinking the 12 workers/server (Resque) vs 80 workers/server might account for the rest of the difference.
Troubleshooting tip
One feature that I found useful is that if you send a TTIN signal to a Sidekiq worker, each thread will print its backtrace in the log.
So, if you tail the Sidekiq log, it’ll tell you the PID of the process:
2014-12-10_22:28:55.22696 2014-12-10T22:28:55.226Z 31340 TID-u2nf0 [WorkerName] JID-f563b9dd180c5e0eb4f44186 INFO: done: 0.025 sec
In the above example, it is 31340. Then you would send the signal:
kill -TTIN 31340.
Then tail the log again and you should see backtraces for all of the threads in the worker.
These three commands (awk, sed and grep) center around text manipulation and transformations. They are useful for every developer; oftentimes for simple tasks, it is easier to use one of these three tools rather than write a Python or Ruby script.
###Awk
####What does it stand for?
The initials of the creators’ names- Aho, Weinberger and Kernighan.
####What does it do?
Awk is a text pattern scanning and processing language. An awk program operates on each line of an input file. For each line of the input file, it sees if there are any pattern-matching instructions (usually regular expressions), if yes, it only operates on lines that match that pattern; otherwise it operates on all lines.
The operations can be sophisticated math and string manipulations, and awk also supports associative arrays (otherwise known as a hash or dictionary).
Awk sees each line as being made up of a number of fields, each separated by a “field separator”. Within awk, the first field is referred to as $1, second as $2, etc. The whole line is referred to as $0. So you can output or manipulate specific fields in each line.
####What is the most common syntax used to invoke it?
As a stand-alone command:
awk '/search_pattern/ { action_to_take_on_matches; another_action; }' file_to_parse
Or using a pipe:
cat file.txt | awk '/search_pattern/ { action_to_take_on_matches; another_action; }'
####What is it useful for?
- Parsing complicated log files so that only the fields you care about are outputted
- Parsing files and outputting one particular field to pipe into another command
- Basic-to-intermediate number processing (using associative arrays)
####More details:
By default, a field separator is one or more space characters. You can customize what the field separator is by setting the internal variable FS. So FS=":" will divide a line up according to the position of the :.
Awk can operate on any file; most commonly people use it to operate on std-in through the | pipe operator.
One other awk pattern to note is:
BEGIN { Actions}
{ACTION} # Action for every line in a file
END { Actions }
In this case, actions in the BEGIN block will get executed before any of the lines are processed, and the actions in the END block will get executed after all of the lines are processed.
####Example:
cat ~/.ssh/config | grep Hostname | awk '{print $2}'
- Print out the 2nd column (the urls) for all of the hosts in the ssh config file.
####What does it do?
Sed performs basic text transformations (replacement, insertion, deletion) on an input stream very quickly and efficiently.
####What is the most common syntax used to invoke it?
sed -e '/search_pattern/ command' filecommand can be (most commonly):
- s for search & replace
- p for print
- d for delete
- i for insert
- a for append
But the most common use for sed is as a search and replace, and the syntax for that is slightly simpler:
sed 's/old_value/new_value/g' file_name
The s in the beginning is for search & replace. And by default it only replaces the first old_valueon each line it finds. The g at the end makes it global (does it for all old_values in a line).
Another common pattern is searching for a pattern and then replacing that pattern by adding extra characters to it. In this case, use & to represent the matched string:
sed 's/unix/{&}/' file.txt
Will replace unix with {unix}
####What is it useful for?
- It’s great for simple text transformations
- Massaging text so that a particular string is removed or changed
####What does it stand for?
G lobal R egular E xpression P rint
####What does it do?
Grep searches input files for a particular search string line by line. If it finds a match, by default it will copy that line to standard output.
####What is the most common syntax used to invoke it?
The simplest way:
grep "search_pattern" file_name
Using a pipe:
cat file_name | grep "search_pattern"
Output with line numbers:
grep -n "search_pattern" file_name
Finding all files in a directory (and its sub-directories) that match a search string:
grep -nR "search_pattern" directory
One common/useful flag is -C [num] which prints out [num] lines before and after a matching line.
####What is it useful for?
- Parsing large files to output only the lines that you need
- Finding files in a directory that contain a search string
####Examples:
grep -nR "User" /rails/app
- find all lines that contain User in the /rails/app directory and its sub-directories. Output will include line number.
tail -f ./development.log | grep "TwitterWorker"
- tail (stream) the development log file and output only lines that match TwitterWorker
Docker is an open-source project that automates the deployment of applications inside software containers. I won’t get into the technical details, which I think are best explained on the Docker website itself. But basically its tagline is ‘build once, run anywhere’; instead of having to configure an environment through scripts a la Chef or Puppet, you can package up an entire environment along with the app and run it again on another machine. It is similar to a Virtual Machine, but it uses your current OS and, where appropriate, bins and libraries, so there’s virtually no performance or start-up penalty.
Getting started with Docker
Docker is made up of a daemon and a binary which acts as a client. It has excellent documentation, which walks you through all the steps of setting up Docker. On all native Linux machines, the installation of the daemon is relatively straightforward. I am using a Mac, so I needed to install a workaround VM (which contains the Docker daemon) called boot2docker to get it working on my machine. I’ll walk through the steps and the gotchas I ran into here.
Mac installation instructions are here. I ran through the Installing VirtualBox steps and then the Installing boot2docker with Homebrew steps. At the time, I ran into one small issue while installing boot2docker, which may or may not exist now. It is outlined here, and I resolved it by moving boot2docker.iso into the bin dir.
The rest of the instructions to get boot2docker up are straightforward. Just three gotchas that I ran into:
During the initial setup, completing the Using Docker port forwarding with boot2docker section is optional. However, if you ever start a container as a web server, you’ll need these port forward configurations to access it. This is because the container will configure a forward port (looks something like 0.0.0.0:49158->80/tcp), but that port number is the port on the VM, not your local machine. So you won’t be able to actually access it unless you run those Docker port forwarding steps.
The instructions state you need to run export DOCKER_HOST=tcp://127.0.0.1:4243, which lets the Docker client know where the Docker daemon is. You may want to include DOCKER_HOST=tcp://127.0.0.1:4243 into your .bashrc (or equivalent) so that you don’t have to run the export command every time you open a new shell.
If you ever have trouble connecting to the Docker daemon (if any of the docker commands gives an error), restart boot2docker (boot2docker restart). That resolves most of the problems for me.
Testing your Docker installation
The next step is to run a simple command within a Docker container. This page walks you through the steps of printing out “Hello World” from within a Docker container: http://docs.docker.io/examples/hello_world/. Pay particular attention to the syntax of running a command in a Docker container:
$ sudo docker run busybox /bin/echo hello world
This command will run a simple echo command, that will echo hello world back to the console over standard out.
Explanation:
“sudo” execute the following commands as user root
“docker run” run a command in a new container
“busybox” is the image we are running the command in.
“/bin/echo” is the command we want to run in the container
“hello world” is the input for the echo command
Docker images and containers
Listing Docker images
So now that we have an image and container, we can take a look at some commands to view and run them commands within them. First is the command to view your local Docker images:
docker images
A Docker image is a read-only layer1 that never changes. These are self-contained environments that can be passed around and will run exactly the same from machine to machine.
Similar to github, Docker has its own online public (and private) repository at http://index.docker.io. In the Testing your Docker installation section, when you ran sudo docker pull busybox, it looks for and then downloads the busybox repository from index.docker.io. You can also push your own images onto the Docker index with docker push [name of image].
Listing Docker containers
Once you have an image, you can run a command on it. Any images that have had a command run within it, or any image that have a command currently running on it, can be displayed using:
docker ps -a
To view only active running Docker containers, just leave off the -a (docker ps).
Running a command in a Docker container
To access the bash shell of an image, run the image using:
docker run -t -i [image name/id] /bin/bash
The -t tells it to allocate a pseudo-tty, and -i tells it to run in interactive mode. The last part of the run command is the command you want to be run in the container, so in this case we are running /bin/bash to open up a shell. After you run that docker command, you should see a new command prompt, something that looks like:
root@f14a378e2186:/#
This docker run command will spawn a new container from the specified image. So if you open up another local terminal window and run docker ps, you should see a new container listed.
Stopping an active Docker container
Docker containers automatically stop running if the command you pass to it completes. So running docker run busybox /bin/echo "hello world" would result in “hello world” getting printed out and then immediately afterward the container would stop running. On the other hand, a command like /bin/bash would have the container running continuously until it is manually stopped.
To manually stop a container, you run docker stop [container id].
Removing a Docker container
All stopped containers will continue to exist, so you can restart them at any point using docker start [container id]. To completely remove a container, you can run docker rm [container id].
How to include API calls in Rails callback hooks without blowing up your tests
While integrating an Instagram media consumer into our app, I ran into a unique use case- I needed to call the Instagram API during model creation/modification, but including after_create and after_save callback hooks in the model would make my RSpec tests fail. This was because if I used FactoryGirl.create to create that model, it would try to make an unnecessary API call.
As you can see, it includes an after_create callback to ping the Instagram API to get the user’s instagram_id and full_name. It also has an after_save callback to ping the Instagram API to follow or unfollow the user on our configured Instagram account.
This resulted in a complicated model test where I had to instantiate the InstagramAccount object, then stub the two callbacks out, before actually saving it to the test database. Being in Rails 2 made it extra ugly because I couldn’t use the #any_instance RSpec helper.
require'spec_helper'describeInstagramSyncFollowingWorkerdoit'should update import_enabled for accounts that are not being followed anymore'doVCR.use_cassette'lib/instagram_user_follows_2'doaccount=FactoryGirl.build(:instagram_account)account.stub(:sync_following)account.stub(:get_instagram_id)account.saveInstagramSyncFollowingWorker.performInstagramAccount.find(:all,:conditions=>["import_enabled = ?",true]).count.should==2InstagramAccount.find(:all,:conditions=>["import_enabled = ?",false]).count.should==1endendend
The controller spec was even more convoluted, because I couldn’t actually instantiate an object and stub out the instance methods, since the controller handles all of that. So I had to monkey-patch the model, and also un-monkey-patch it so it didn’t affect subsequent tests.
require'spec_helper'describeAdmin::TeamStreamsControllerdocontext"instagram accounts"dobefore(:all)doclassInstagramAccountalias_method:sync_following_old,:sync_followingalias_method:get_instagram_id_old,:get_instagram_iddefsync_followingenddefget_instagram_idendendendafter(:all)doclassInstagramAccountalias_method:sync_following,:sync_following_oldalias_method:get_instagram_id,:get_instagram_id_oldendendit"should create an instagram account"do...endendend
This clearly was a code smell, so after some research, I tried re-factoring the callbacks into an Observer class. This resulted in the after_create and after_save hooks being removed from the InstagramAccount model, and moved into InstagramAccountObserver.
Now, for the tests, I added the no-peeping-toms gem by Pat Maddox, which essentially allows you to turn off all observers during RSpec test runs. After adding the gem, it is as simple as adding ActiveRecord::Observer.disable_observers into your spec_helper.rb file. This then allowed me to remove the before(:all) and after(:all) hooks in my controller test.
In the InstagramAccount model spec, I wanted to test one callback, but didn’t want the other to run. So I enabled observers for that particular test and then stubbed out the one I didn’t need:
require'spec_helper'describeInstagramAccountdocontext"follow/unfollow"dobefore(:each)do@account=FactoryGirl.build(:instagram_account)InstagramAccountObserver.instance.stub(:after_create=>true)endit'should send an api call to instagram when an account is disabled'doActiveRecord::Observer.with_observers(:instagram_account_observer)do@account.save@account.should_receive(:unfollow_user)@account.update_attribute(:import_enabled,false)endendendend
After all this, I started reading up on how, in general, callbacks may be code smells in general - even those in Observers:
Understanding when/why to use before(:all) vs before(:each) vs let vs let!
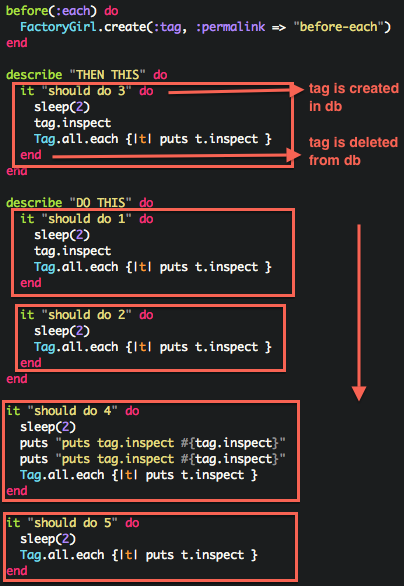
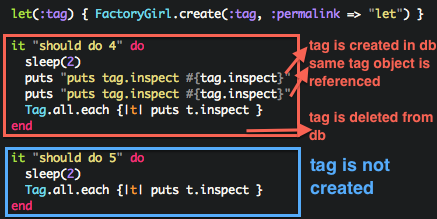
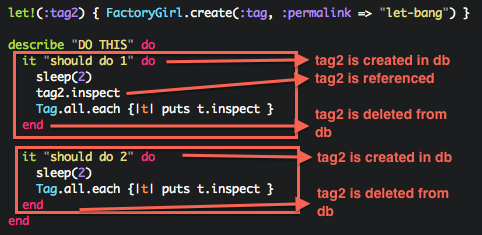
I’ve learned to use before and let to DRY up RSpec tests, as well as make them more readable. However, I didn’t have a complete grasp of what each of them did. I decided to write some code that helped me understand exactly what each of them do, and when I should be using each one.
cached across multiple calls in the same example but not across examples
cleans itself up after it-block
Tips
Most of the time you should be using let and/or before(:each)
let is almost always preferable to reference objects
instance variables spring into existence only when necessary
before(:each) will create all objects even if the example doesn’t use it
before(:all) shouldn’t really be used for variable setup, because it introduces an order dependency between specs
Good use cases: opening a network connection, pre-seeding caches
If you use before(:all), think about using corresponding after(:all) for clean-up
before(:each) can be used to instantiate objects to make specs easier to read, if there is a lot of setup involved before an example
If you need records in the db without first referencing an object, before(:each) seems to be a better choice than let!
Don’t mix before and let together, i.e.
before(:each);let(:foo){};end
* You'll get a warning in RSpec 2 but not RSpec 1: `let` and `subject` declarations are not intended to be called in a `before(:all)` hook, as they exist to define state that is reset between each example, while `before(:all)` exists to define state that is shared across examples in an example group.